
Senin, 31 Oktober 2016
Jumat, 28 Oktober 2016
Assassin's Creed 4 Naval Contract Locations (10)
There are 15 Naval Contracts in Assassin’s Creed 4: Black Flag. Naval contracts can be obtained in fortresses. They require hunting down ships that are part of the contract, protecting ally ships or collecting different amounts of resources. Completing half of them, you receive The Ranger figureheadand Queen Anne’s Revenge wheel. Completing all of them you receive achievement/trophy “Sea Legs“,gilded sails (blue sails with golden marks) and golden flintlock pistols (damage 5, stun 5, range 3). Alongside these great prizes, each naval contract rewards additional money, as well as sank/boarded ship’s loot. Reward range goes from 1200R at the bottom of the line, 1800R as a middle of the line reward, and 2400R for the toughest, highest one.


1. Dry Tortuga (254,749) – Private Escort (Naval Contract 07)
You are supposed to protect Neptuno, ally ship, from attacks of enemies that comes with 3x gunboats in the first wave and 3x brigs as the second. Mortars are great help here, since they enable you to attack them from distance, before they even reach Neptuno. Mission reward is 2400R and difficulty labeled by game as 5/5.
2. Eluthera (726,784) – A Spanish Plague (Naval Contract 03)
Sink three Spanish gunboats to get 1200R. This is level 1/5 difficulty naval contract. Spanish gunboats are close to Eluthera fort. Open up map and head towards the closest group.
3. Gibara (657,521) – Silk on the Waves (Naval Contract 05)
This is a rather easy contract. You should collect and give silk to your contract’s contact. If you have it in your stock, as you take this contract, it gets automatically done and you can collect 1200R prize immediately. For some reason this contract has level 2/5 difficulty.
4. Punta Guarico – Weathering the Storm (Naval Contract 13)
This level 1/5 difficulty and 1200R prize contract requires you to locate and sink British ships. The most difficult thing beside ship numbers (3 brigs and 2 gunboats) is the weather. Weather gets really bad, as you approach them, and you should avoid big waves as well.
5a. Navassa (728,219) – Blind Justice (Naval Contract 08)
1800R money reward and 4/5 difficulty mission. To claim its prize, you should sink 3x level 17 brigs. They are protecting your main target, British man o’ var, that is hiding in a small cove, just behind the three brigs you just defeated.
5b. Navassa (728,219) – A Personal Matter (Naval Contract 15)
1800R and 4/5 difficulty mission. This mission has a simple task, find and sink “HMS Defiance” ship. It doesn’t have any escort, you can use the ramming tactics, with swift heavy shot fire, with additional flavor of fire barrels.
6. Cabo de Cruz (566,390) – Driftwood (Naval Contract 04)
In order to receive 1800R for this level 4/5 difficulty mission, you should loot 60 wood out of crates. If you have it already on your ship, mission is completed without any need to go out there again.
7. Castillo de Jagua (356,559) – Eye for an Eye (Naval Contract 01)
Eye for an Eye naval difficulty level 3/5 mission rewards 1800R. This mission requires you to board, not sink, level 23 frigate. When you board it, be sure to kill the required amount of crew before destroying enemy ship’s flag, as this will remove the stress of moving down. Mission ends when you choose what you want to do with the ship.
8a. Conttoyor (102,547) – The Law Of The Ocean (Naval Contract 02)
1800R and 3/5 difficulty naval mission sends you to the ambush location, south of where you took the mission. As you approach it, cut scene starts and group of 5 ships show up south of you. The ship called Hercules is your main target. You can sink others but you need to board Hercules. This is one of the ships you do not actually need to board, as you can reach the goal of boarding by killing 10 members of its crew with your swivel gun.
8b. Conttoyor (102,547) – The Realities of War (Naval Contract 10)
This level 5/5 difficulty and 2400R reward mission requires you to locate your allies. As you approach their location you receive new mission objective “Sink the Spanish convoy”. There are 2 ships brigs/frigates as the first attack wave and 3 ships, one man o’ war and 2 brigs/frigates as the part of the second attack squad. Once again, mortars are your best friends, as you can hurt them just enough so they don’t pose any real threat as you close your distance to them.
9a. Chinchorro (124,357) – Contraband (Naval Contract 06)
2400R and 5/5 difficulty mission. If you want to complete this contract you should sink 1x Spanish frigate and 2x Spanish brigs. There are couple of level 38 Frigates and level 25 Brigs in the area around Chinchorro. Open up your map and identify the closest group of ships. With a bit of luck, you should find all of them there.
9b. Chinchorro (124,357) – Smuggler’s Den (Naval Contract 14)
2400R and 5/5 difficulty mission. Completing this contract requires heading southwest of Chinchorro to the large cove. Large group of 6 ships are awaiting for you in front of it. One man o’ war, 2x brigs/frigates, and 2x gunboats compose the blockade. Take them by surprise. Do not alarm them too early by firing mortars at them, instead, approach them until you are fairly close and take one by one. If you keep close to them, other ships that are part of this group will not fire at you, as they do not shoot when ally ships are around.
10. Serranilla (347,140) – The Final Contract (Naval Contract 09)
2400R and 5/5 difficulty mission. This contract sends you on a quest to find and protect pirate ship “The Hollander”. The toughest part of this contract is the fact that “The Hollander” is known to be under constant fire of enemy ships. First attack group of ships comes with couple of level 17 brigs. They are rather fast ships. Protect “The Hollander” by rushing towards them. Do not waste all your mortar shots. Save them for the second attack group. They come with level 60 man o’ war. This ship has a lot of health. Get its attention by firing mortars at him. Do not lose “The Hollander” out of your sight, as other ships that you might miss, can go after him.
11a. Charlotte (470,272) – Hunter Gatherer (Naval Contract 11)
2400R and 5/5 difficulty mission. Hunter Gatherer contract requires you to sink 2 hunter ships. You need to raise your wanted level to attract hunter ships. This can be done by sinking other ships without lowering your wanted level. As you sink other ships, cross swords icon above your ship’s health bar fills up. As it goes full red, hunter ships are sent after you. When you defeat the first one, you can wait for the other one to spawn, or simply continue your pirate rush until the other one spawns.
11b. Charlotte (470,272) – Papers, Please (Naval Contract 12)
2400R and 5/5 difficulty mission. Contract with a simple task; find and sink “HMS Courage”. This man o’ war should be rather easy to sink, as it has no escort.
Assassin's Creed 4 Templar Hunt Guide (9)
Templar Armor Keys Hunt starts with the mission “This Old Cove” in Great Inagua. As you follow James Kidd through the Island, you’ll discover a mansion with great treasure and Templar Armor locked in a cage. Kenway opens one lock at this point. He realizes that he still needs 4 more keys to open it. After opening the map, bought from Governor Torres, locations of other 4 keys are revealed. You can start looking for the keys in any order you prefer.

Their names are
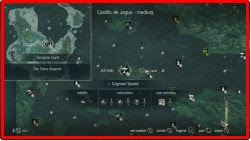
Opia Apito starts in Cayman Sound (327,334) when you approach and interact with Opia Apito.


Templar Hunt Rhona Dinsmore starts in southern Havana (240,607) after the interaction with Rhona Dinsmore.


Templar Hunt Anto starts in Kingston (623,172) when you approach and interact with Anto.


Templar Hunt 04 starts in Nassau (633,784) as you approach and interact with Vance Travers.


Their names are
- Templar Hunt Opia Apito – starts in Cayman Sound (327,334). Continues in Grand Cayman (397,324), ends in Pinos Isle (335,469);
- Templar Hunt Rhona Dinsmore – starts and ends in Havana (240,607);
- Templar Hunt Anto – starts and ends in Kingston (623,172)
- Templar Hunt Vance Travers – starts and ends in Nassau (633,784)

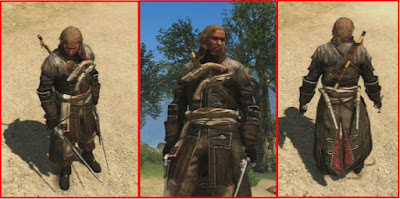
Along with the key, as main reward, each mission gives money reward as well (from 150R up to 1500R). Grand prize is the Templar Armor – Pride of the Templars, a light and flexible armor that offers increased resistance to enemy attacks.
TEMPLAR HUNT OPIA APITO
Opia Apito starts in Cayman Sound (327,334) when you approach and interact with Opia Apito.
The Taino Assassin
Within this mission objective, you should hunt down and skin more animals than Opia. Open up your map and look for green circled areas. Within these areas you can find animals, but be prepared since Opia will hunt alongside with you in the same area. As you finally win this battle another objective shows up: Survive and kill the jaguar. This one can be pretty hard as the jaguar can easily kill you if you are without ammo for guns or darts, so, if you can, save some for this part of the mission.
Templar Ships
This mission objective starts on Grand Cayman (397,324). This island is to the east of the Cayman Sound, the island where you started Templar Hunt #1. In order to complete this part, you should find Alvin, eavesdrop on him, and steal the ledger he is carrying by pick-pocketing him.
Right-hand Man
Upon completing the previous part, return to Alvin’s start location, and find Opia. She’ll ask you to hide, while she lures your target Vargas. Instead, he’ll run away towards a ship in the Grand Cayman port. Follow him and incapacitate his ship with Jackdaw. When you get on Varga’s ship, and complete the boarding task a cutscene starts where Vargas gives you the information about where to find the key.
The Trail of Lucia Marquez
Travel to Pinos Isle (335,469) to start the last mission of Templar Hunt #1. At the southern part of the island Opia waits for you. When a soldier appears follow him until you reach a group of 4 guards. You can easily kill them if you shoot at the red barrels nearby. Your final target Lucia Marquez shows up. Track her down and kill her.
TEMPLAR HUNT RHONA DINSMORE
Templar Hunt Rhona Dinsmore starts in southern Havana (240,607) after the interaction with Rhona Dinsmore.
Bureau under attack
This is a fun event. This objective requires you to defend Rhona from groups of attacking soldiers. They’ll come after 30 seconds. During this pause look for the powder kegs next to Rhona and take them to nearby stairs (and later make them explode), because the soldiers will come from that direction when the timer runs out.
A Thief in the Market
Interact with Rhona again to start the next hunt objective. Locate a pickpocket in a market, catch him and grab his loot.
Arms Race
Go back to Rhona and start another quest to ignite and destroy 3 powder reserves. They are marked on the map and guarded by soldiers.
Flint’s End
This time Rhona is next to a general store, north of the position where you took the previous objective. Follow Rhona to a nearby dock, then track down and assassinate Flint. Be sure not to leave Rhona alone since she can die easily.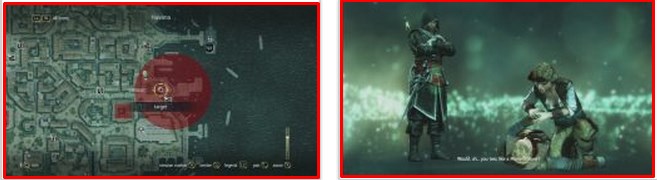
TEMPLAR HUNT ANTO
Templar Hunt Anto starts in Kingston (623,172) when you approach and interact with Anto.
The Maroon Assassin
Guards that you should eavesdrop on are west of you. Keep your distance as they can turn and spot you. To make the task easier walk with other residents of Havana, or even hire a group of dancers. This makes eavesdropping task “classy”, as it removes the need to jump over roofs or hide behind house corners in order to stay undetected. As the conversation ends, catch one of the guards by running into them.
Recruiting Maroons
Find Anto north of Kingston’s tavern. This mission objective requires freeing 3 slaves. They are in three different positions in Kingston. As you approach them use the factor of surprise to your advantage and jump onto guards from high ground for clean and fast kills.
Under Attack
Anto is again at the position from where you started Templar Hunt #3. This is another fun objective. Defend the bureau from soldiers while using 30 second timer between their attacks to kill the ambushing enemies that spawn in three different places around the bureau. Smoke bombs are more than great for this occasion.
The Commander’s ruse
Anto is now located east of the main crossroad in northern Kingston. Final task requires you to tail the guards. If you hire nearby dancers you can do this smoothly. As they move east, they reach a compound with many soldiers. This is where you gain a new objective: “Locate the real target”. Activate eagle vision towards green circle areas on the map to reveal and kill Kenneth Abraham. As you proceed from the southern green map area, you can guess that he is at the most northern one. He tends to walk near the well, ring bell, and bushes at the west side of the compound. Wait for him there and take him out with ease.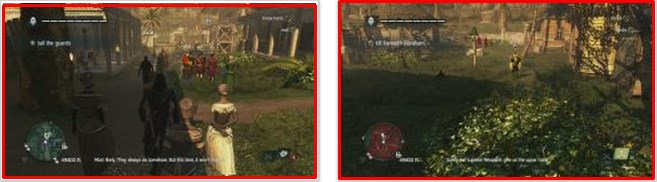
TEMPLAR HUNT 04 – VANCE TRAVERS
Templar Hunt 04 starts in Nassau (633,784) as you approach and interact with Vance Travers.
Oh Brother…
This task has three steps. Locate and follow Upton’s men northwest of where you started the Templar hunt. They lead you to Upton Travers, whom you are supposed to kill. You can avoid his guards by climbing on nearby rooftops. Jump from there onto Upton or use berserk darts.
The Other Brother
Upton Travers is your new mission giver. You can find him in eastern Nassau. Follow Upton now. Soon enough, he is going to tell you to hide in foliage, as his brother is supposed to come. Follow them both, while protecting them from thiefs. The first one shows up as they stop for the first time. The second one approaches as they get close to gallows. If you run toward the gallows and hide in the foliage, there is a big chance that the thief will not show up at all. To bring this objective to an end, eavesdrop on the conversation between Vance and the Jing Lang. After that hunt down and kill Upton’s killer.
Upton’s Sorrow
Upton that gives this objective can be found in Nassau tavern. As the first part of this objective you are supposed to defend Upton as he gets into a fist fight. Be sure not to push the first group of tavern brawlers toward the nearby audience. If you do so, other brawlers will join the fight, making it hard to protect Upton, or even yourself. The second part requires escorting Upton to safety. As you kill guards irritated by Upton’s your mission ends.
Queen of Pirates, Kings of Fools
Find Upton west of Nassau tavern to start this mission. This mission has a simple task to track down and kill Vance and Jing Lang. They can be found in western Nassau (Western part of crocodile’s swamp).
AC4 Mayan Stela Stones Locations Guide (8)
In order to acquire Mayan Outfit, which deflects metal projectiles, you have to find 16 Mayan Stelas and arrange Mayan Stones in correct order. Mayan Stelas are scattered throughout the map, usually one per island (Cape Bonavista, Cat Island, Great Inagua, Tulum, Tortuga, Matanzas, New Bone and Long Bay), but on some islands you can find two Stelas: Pinos Isle, Misteriosa, Santanillas and Isla Providencia. In order to reach Isla Providencia and Long Bay Islands you should progress through your main story.
When you find a Mayan Stela, you have to solve a puzzle and reveal stones that each Stela hides. The Mayan Outfit is hidden behind a secret door in Tulum, that can be opened after collecting 16 Mayan Stones. When you finish the mission The Memory 04 Overrun and Outnumbered, talk to James Kidd, who will unveil a hidden location of Mayan Outfit.


When you find a Mayan Stela, you have to solve a puzzle and reveal stones that each Stela hides. The Mayan Outfit is hidden behind a secret door in Tulum, that can be opened after collecting 16 Mayan Stones. When you finish the mission The Memory 04 Overrun and Outnumbered, talk to James Kidd, who will unveil a hidden location of Mayan Outfit.

1. Cape Bonavista Mayan Stone

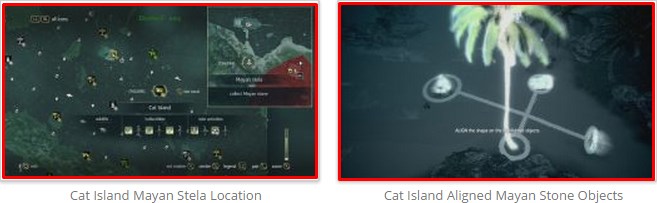
2. Cat Island Mayan Stone
3. Great Inagua Mayan Stone
Note: Mission “This Old Cove”, where you follow James Kidd takes you to this location. Finding this Mayan Stone is part of the mission.

4. Tulum Mayan Stone

5. Tortuga Mayan Stone

6. Matanzas Mayan Stone

7. Pinos Isle Mayan Stone I

8. Pinos Isle Mayan Stone II

9. Misteriosa Mayan Stone I

10. Misteriosa Mayan Stone II

11. New Bone Mayan Stone

12. Santanillas Mayan Stone I

13. Santanillas Mayan Stone II

14. Isla Providencia Mayan Stone I

15. Isla Providencia Mayan Stone II

16. Long Bay Mayan Stone

Langganan:
Postingan (Atom)